
Hello again Magenta friends! Norine here, back with you for another guest designer post! Today, I have four cards to share! That sometimes happens....I get rolling with one design and it turns into another and another and before I know it, I have four cards when I only needed one!
Bonjour encore les amis de Magenta! Norine ici, de retour avec vous pour un autre article de designer invitée! Aujourd'hui, j'ai 4 cartes à partager! Cela arrive parfois ... Je commence avec un design et ça se transforme en un autre et avant que je le sache, j'ai 4 cartes quand j'en ai besoin d'une!

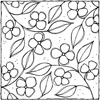
The link between these cards today is a background floral stamp that I used in a variety of ways.
Le lien entre ces cartes est aujourd'hui une étampe florale que j'ai utilisée de diverses façons.

This first card is stamped onto watercolour paper with black ink, heat embossed and coloured with watercolour pencils and then painted with a water brush. I wanted to let the design and paint colours be the focus so I just added a sentiment at the top, wrapped some black thread around the card panel a couple of times and tied it and added some contrasting enamel dots (to match the flower center).
Cette première carte est étampée sur du papier aquarelle à l'encre noire, embossée et coloriée à l'aide de crayons aquarelle, puis peinte avec un pinceau à eau. Je voulais que le design et les couleurs de peinture soient au centre, j'ai ajouté un sentiment au sommet, enroulé un fil noir autour du panneau de la carte et l'ai attaché et ajouté quelques points d'émail contrastants (pour correspondre aux centres de fleurs) .

This next card is also stamped onto watercolour paper, but with Versamark ink and heat embossed with white embossing powder. This time I used my watercolour paints to paint the design in very pale, antique-y colours. The stamp is a square one, and leaves one end of an A2 sized card panel empty, so I used some of the remaining paint to add lines at the bottom. I added a narrow strip of matching cardstock to define the line between and to anchor the stamped sentiment. Because vellum is an elegant addition to a card, but can be tricky to adhere without adhesive showing through, I layered 3 pieces of vellum and used Tacky Spray adhesive on the backs to adhere them together.
La carte suivante est également étampée sur du papier aquarelle, mais avec de l'encre Versamark et de la poudre à embosser blanche. Cette fois, j'ai utilisé mes peintures à l'aquarelle pour peindre le dessin en couleurs très pâles et antiques. L'étampe est un carré, et ne couvre pas complètement une carte A2, j'ai donc utilisé une partie de la peinture restante pour ajouter des lignes au bas. J'ai ajouté une bande étroite de papier cartonné et positionné le texte. Parce que le vélin est un ajout élégant à une carte, mais qu'il peut être difficile d'adhérer sans que l'adhésif n'apparaisse à travers, j'ai étalé 3 morceaux de vélin et utilisé l'adhésif Tacky Spray sur le dos pour les coller ensemble.

The card above was created by stamping the background stamp twice onto white cardstock and heat embossing with black. One of the stamped card stocks I left plain, trimmed it down to be 1/8" narrower on each side and stamped on a sentiment on the bottom. Then, I used Copic markers to colour the entirety of the 2nd stamped card stock panel. I cut out all the flowers, leaves and branches and arranged them to create the little bouquet along the bottom. I added a narrow strip of matching card stock again to anchor the flowers visually and then added a few matching enamel dots to complete the card.
La carte ci-dessus a été créée en étampant deux fois sur du papier cartonné blanc et en les embossant en noir. J'ai laissé vide un des deux morceaux étampés et je l'ai réduit de 1/8 de chaque côté et marqué d'un sentiment sur le fond, puis j'ai utilisé des marqueurs Copic pour colorier l'intégralité du second morceau de papier cartonné. J'ai découpé toutes les fleurs, les feuilles et les branches et les ai arrangées pour créer le petit bouquet le long du fond.J'ai ajouté une bande étroite de carte assortie pour ancrer les fleurs visuellement et j'ai alors ajouté quelques points d'émail correspondants pour compléter la carte.

This last card came about because the card above it only needed 3 blooms and 5 leaves and I still had more left over from what I'd coloured and cut out. So, I chose some patterned paper and coordinating card stock to die cut and assemble, added a stamped sentiment and adhered the remaining floral branch and leaves to the card front. Once a again, a few matching enamel dots complete the card.
Cette dernière carte est née parce que la carte au-dessus ne nécessitait que 3 fleurs et 5 feuilles et il me restait encore plus de ce que j'avais coloré et découpé. J'ai donc choisi du papier à motifs et du papier cartonné coordonné pour découper et assembler, ajouté un sentiment et j'ai collé la branche et les feuilles florales restantes sur le devant de la carte. Une fois de plus, quelques points d'émail correspondants complètent la carte.
*****
Magenta products used:
Magenta products used:
Produits Magenta utilisés:


2 comments:
Love all of them. Love the soft blues and greens. Thanks for the inspiration.
OOOO, that is great! They all 4 are just beautiful.. you really made this stamp stand out so gorgeous!
Post a Comment